
How to Make On/Off Columns in Pine Script

Creating on/off columns in Pine Script might sound tricky at first. Traders often struggle to make their scripts more interactive and user-friendly. Without clear visual aids, trading data can get messy and complicated to follow.
That’s where Pine Script’s tables come in, offering a way to organize and display dynamic data effectively. By adding on/off columns, you can streamline your script by letting users toggle options easily.
This guide will show you how to create on/off columns, adjust table positions, and customize them effortlessly. Whether you’re new to Pine Script or a seasoned developer, these steps will make your scripts more powerful and user-friendly.
In this post, we will learn in detail how to Make On/Off Columns in Pine Script. After reading this, I hope you know everything about this.
Understanding On/Off Columns in Pine Script
An on/off column in Pine Script is a powerful tool designed to make trading indicators more interactive and user-friendly. It allows users to toggle features, control visibility, and dynamically manage displayed values in a script.
Essentially, it’s a column within Pine Script’s table functionalities that behaves as a switch—similar to checking or unchecking boxes—to decide whether an option should be enabled or disabled.
Practical Applications of On/Off Columns
On/off columns are highly versatile and can serve several practical purposes to improve trading strategies. Here are a few key applications:
- Toggling Indicators
Traders can use on/off columns to switch specific indicators on or off easily, saving time and reducing screen clutter. For example, toggling moving averages when analyzing short- or long-term trends.
- Dynamic Value Display
These columns allow traders to interact with dynamic values, showing relevant data only when needed. This makes understanding trading data simpler and avoids overwhelming visuals.
- Highlighting Data Points
On/off columns can act as a filter to spotlight key data such as buy/sell signals or risk-alert zones. This improves decision-making by quickly focusing attention on critical trading opportunities.
- Filtering Trade Information
They help narrow down specific data points based on user preferences, such as showcasing only successful trade setups or particular chart periods.
Common Use Cases
1. Tracking Trade Signals: Highlight active trade signals while disabling inactive ones for a cleaner view.
Example: “Green signals for confirmed trades, red signals for canceled ones—organized and efficient.”
2. Customizing Outputs: Give users control over whether they want to display specific data.
Benefit: “Customize your screen to show only the metrics that matter to you.”
3. Enhancing Strategy Visuals: Allow users to toggle noise-reducing overlays or highlight significant trends in volatile markets.
“An organized script saves time and improves focus—on/off columns make this possible.”
On/off columns are a trader’s ally for managing clutter and increasing interaction with data. Leveraging these features boosts script usability and enhances the overall experience of navigating Pine Script. Your trading strategy becomes sharper and more actionable by contextually presenting relevant information.
Also Read: How to Install Parrot OS into an External SSD | 2025
How to Create a Table in Pine Script
Tables in Pine Script are a powerful feature for displaying data visually within your trading charts.
You can showcase trade signals, statistics, or other data in an organized format using tables. This enhances your chart’s readability and equips you with actionable insights.
What is a Table in Pine Script?
A table in Pine Script is a visual element that displays structured data, like rows and columns, directly on your chart.
It aims to make essential trading details, like signal status or performance metrics, accessible without needing external tools. Tables improve decision-making speed by keeping useful information visible at all times.
“Good data organization speeds up decisions, and tables in Pine Script deliver just that!”
Step-by-Step Guide to Creating a Table
Follow these steps to create a simple, functional Pine Script table that effectively displays trade signals.
Declaring a Table (Using `table.new` Function):
The `table.new()` function initializes a table in Pine Script. You must define its size (rows and columns) and where it will appear on your chart.
“`pine
trade_table = table.new(position = position.top_left, columns = 2, rows = 5)
“`
This creates a table with 2 columns and 5 rows in the top-left corner of the chart.
Also Read: How to Find Waveform Files for Idoru App | A Complete Guide
Setting Table Position (Using `position` Parameter):
The `position` parameter determines where the table will appear, such as `position.top_left` or `position.bottom_right`. Choose a placement that doesn’t obscure critical chart data.
Adding Rows and Columns:
Define the number of rows and columns according to how much data you want to display. For example, 2 columns could represent “Signal” and “Status,” while rows could list individual trades.
Populating the Table with Static Values:
Use the `table.cell()` function to add specific data to each cell. This could include text or numeric values.
”’
pine
table.cell(trade_table, column = 0, row = 0, text = “Trade Signal”)
table.cell(trade_table, column = 1, row = 0, text = “Status”)
table.cell(trade_table, column = 0, row = 1, text = “Buy Signal”)
table.cell(trade_table, column = 1, row = 1, text = “Active”)
”’
This example creates headers and fills the first row with a trade’s details.
Code Example: A Simple Table Displaying Trade Signals
Here’s a complete example to see it all in action.
”’
//@version=5
indicator(“Trade Table Example”, overlay=true)
// Step 1: Declare Table
trade_table = table.new(position = position.top_left, columns = 2, rows = 2)
// Step 2: Add Headers
table.cell(trade_table, column = 0, row = 0, text = “Signal”, text_size = size.large)
table.cell(trade_table, column = 1, row = 0, text = “Status”, text_size = size.large)
// Step 3: Populate Table
table.cell(trade_table, column = 0, row = 1, text = “Buy Signal”)
table.cell(trade_table, column = 1, row = 1, text = “Active”)
”’
Key Benefits of Using Tables in Pine Script
- Improved Clarity: Tables summarize data for faster and better trading decisions.
- Customizable Layouts: You control the location, size, and content to suit your needs.
- Enhanced Visuals: Make your trading script more user-friendly and visually appealing.
“Organized data builds confidence in trading—tables ensure insights are at your fingertips.”
By incorporating tables, your Pine Script strategies become functional, visually intuitive, and impactful for effective trading.
Adding On/Off Columns in Pine Script
Adding on/off columns in Pine Script enhances the functionality and interactivity of your tables. Here’s how you can implement it step by step:
1: Define Boolean Variables for On/Off States
To create an on/off column, start by defining boolean variables. These variables represent the state, like `true` for “on” and `false` for “off.” Boolean variables are easy to implement and manage in Pine Script, making them perfect for toggle functionality.
2: Use `if` Conditions to Dynamically Update Table Values
With boolean states defined, use `if` conditions to dynamically control the table’s content. For example, if a value is `true`, display “ON” in the table cell; otherwise, display “OFF.”
This ensures data in your table responds dynamically to changes, giving users a real-time experience.
3: Adjust Formatting for Better Visibility
Formatting helps users instantly understand on/off states. Use green for “on” and red for “off.” Adjust text size and alignment so the column stands out visually and is easily read.
Code Implementation
Below is an example of an on/off column using a toggle mechanism in Pine Script:
”’
var bool toggle = true
if bar_index % 2 == 0
toggle:= not toggle
table.cell(trade_table, column = 0, row = 1, text = toggle ? “ON” : “OFF”,
bgcolor = toggle ? color.new(color.green, 0) : color.new(color.red, 0),
text_size = size.medium)
”’
“Dynamic tables bring life to static data—users engage better with real-time updates.” By implementing toggles, your table becomes an actionable and user-friendly feature.
Customizing Table Position in Pine Script
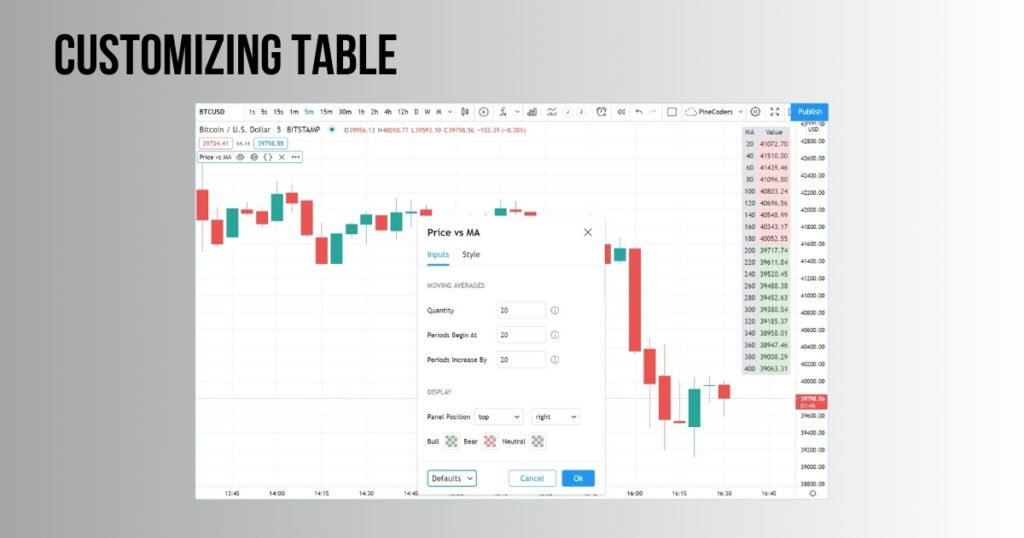
Table positioning in Pine Script allows you to strategically place information for better visibility. Here’s what you need to know:
How Table Positioning Works
The `table.position` property defines where your table appears on the chart. This powerful feature of Pine Script ensures that your data remains well-organized and visible, depending on user preference.
Common Table Positions in Pine Script
Pine Script supports multiple pre-defined table positions, such as `position.top_right`, `position.bottom_left`, and others.
Each location serves different charting needs, letting you configure placements that best suit your strategy. For example, a financial overview table might work best in the top left for quick visibility.
Dynamically Adjusting Table Position
To enhance user accessibility, you can dynamically update a table’s position based on screen size or user inputs.
This ensures the table never obstructs critical chart information, allowing seamless usability. Users with varying device setups appreciate this flexibility greatly.
Example Code for Dynamic Table Positioning
Below is an example of moving a table dynamically based on user preferences:
”’
bool move_table = input(true, title = “Move Table to Bottom Right”)
var position = move_table ? position.bottom_right : position.top_left
trade_table = table.new(position = position, columns = 2, rows = 2)
table.cell(trade_table, column = 0, row = 0, text = “Signal”, text_size = size.large)
table.cell(trade_table, column = 1, row = 0, text = “Status”, text_size = size.large)
”’
“Flexibility in table placement improves user experience—customized data layouts increase efficiency.” Adjusting table positions ensures users stay focused and receive insights effortlessly.
By mastering these functionalities in Pine Script, you can create interactive, visually appealing tables that are highly customized to user behavior.
Enhancing Table Visibility and Readability
Improving table visibility and readability is crucial for delivering an excellent user experience. Small changes, such as using colors, adjusting font styles, and adding tooltips, can transform how users interact with your tables.
Using Colors for Differentiation
Colors help users quickly identify important states or conditions in a table. For example, you can use green to indicate “On” and red to signify “Off,” ensuring clarity at a glance. Proper contrast between the background and text enhances accessibility for users with visual impairments.
> “Color-coded information reduces confusion and boosts focus instantly,” UX designers often emphasize.
Modifying Font Size and Style for Clarity
Larger fonts for headers and meaningful text styles, such as bold for critical data, improve comprehension. Choose easy-to-read fonts to accommodate extended interaction without fatigue. This minor tweak ensures content feels less cluttered and highly readable.
Adding Tooltips for a Better UX
Tooltips provide a compact way to supply extra context without overwhelming the UI. For instance, hovering over “Signal” could indicate the term’s meaning. This feature refines user understanding without disrupting navigation.
Here’s how you can utilize these improvements with code:
”’
table.cell(trade_table, column = 0, row = 0, text = “Signal”,
bgcolor = color.green, text_style = style.bold, tooltip = “Trading Signal Status”)
table.cell(trade_table, column = 1, row = 0, text = “Status”,
bgcolor = color.red, text_style = style.italic)
”’
These enhancements make your tables more dynamic, helping users focus on valuable insights with minimal effort.
Common Errors and Troubleshooting
Mistakes in table implementation can hinder functionality. Here are common errors and how to resolve them effectively:
1: Table Not Displaying
- Cause: A missing or incorrectly initialized table can prevent it from rendering.
- Fix: Ensure the table is initialized using `table.new()` with proper parameters. Verify column count, row count, and position settings.
2: On/Off Toggle Not Working
- Cause: Mistakes in Boolean condition logic can disrupt interactive toggles.
- Fix: Debug your Boolean conditions and confirm they are correctly linked to the input. Log in to check whether the toggle variables are updating correctly.
3: Table Position Incorrect
- Cause: Misusing the `table.position` syntax or input misconfiguration causes incorrect placement.
- Fix: Refer to the documentation for `table.position` and ensure accurate options like `position.bottom_right` or `position.top_left` are specified. Confirm input responses are correctly handled.
By identifying these issues early and resolving them with precision, you can improve the reliability of your code and streamline user interactions.
“Identifying errors isn’t a failure—but skipping fixes might be.”
FAQs
How do you close all positions in Pine script?
To close all positions in the Pine script, use the `strategy.close()` function. This command ensures you exit trades safely by specifying order IDs or conditions directly.
What is the plot function in the Pine script?
The `plot()` function in Pine script visually displays data, such as indicators or calculations, on charts, making analysis straightforward and easier for users.
What is src in Pine script?
The `src` argument in Pine script defines the data source for functions, usually prices like open, high, low, or close, enabling accurate calculations.
What is the average in Pine script?
The average in Pine script calculates the mean value of chosen data points using functions like `ta.sma()` to smooth trends and identify reliable signals.
Conclusion
Creating practical tables in Pine Script combines both functionality and design. Use clear headers, adjustable columns, and movable table positions to make data easily read. Enhance your tables with on/off toggle buttons for added interactivity.
Use conditional formatting, like colors or icons, to highlight important data points. Remember, readable tables help users understand complex data quickly. Experiment with different layouts and styles to find what works best for your needs.
For more examples and tools, check out the GitHub repository scripts. Have fun building, customizing, and improving your Pine Script tables!